Why RTOS?
Most microcontrollers developers writing sequential code for their applications. The microcontroller will execute each function called and asked what to do. This is good for small applications where the microcontroller is supposed to do only one thing in particular. Say you want to use your microcontroller to flash an LED and nothing else or flash an LED and then display a string on the LCD display, you'd do well without feeling the need to implement a system operating within your microcontroller. But for other applications where more than one thing is supposed to be done at the same time, you're stuck.
Have you ever felt that your computer works wonderfully when writing documents, searching the net and listen to quran, all at the same time. This is made possible by operating systems that share your processor time between tasks. All modern embedded systems use an operating system of one sort or another.
Consider a very simple problem, suppose now instead of a single LED flash, you need 4 flashing LEDs simultaneously but each LED is controlled separately and each LED is connected to a port of the microcontroller (A, B, C, D), all with different frequencies, so you can not always do it with the sequential code you've written! This is a practical problem generally require a greater number of tasks running in parallel.
A real-time operating system for RTOS real-time operating system (pronounced Are-toss) is a multitasking operating system for real-time applications. These applications include embedded systems (programmable thermostats, electrical controllers, mobile phones, computer ...), industrial robots, spacecraft, industrial control and monitoring systems, and scientific research equipment.
This tutorial will mount you how to implement a real-time operating system on a PIC18F4580 microcontroller. The compiler used is MikroC Pro for PIC. The operating system used is OSA. We will design a program that will provide you with a basic model to use OSA in almost most applications you will encounter.
About OSA
OSA is a non-preemptive RTOS cooperative for small memory devices. Generally OSA is supported by almost all famous including MPLAB compilers CCS PICC, the AVR studio and MikroC Pro. It provides a large library of functions. And the program structure is very similar to what you already know. In my opinion OSA is an ideal choice for microcontroller-based applications.
Task: A piece of code that the operating system will run. Task is a function that the OS will call repeatedly.
Thread: In the context of this tutorial,it is a function that never ends (at a time (1) loop inside) and takes place in parallel with other son.
Remark:
Being non-preemptive is a drawback, this means that if your program gets stuck in a long loop inside a low priority task, the scheduler would not preempt automatically.
Creating your first multi-threaded program
We will make a program that flashes 4 LEDs with different frequencies, all at the same time. We will launch four son. You're used to have a main function in your microcontroller program where you have an infinite loop. We will write a code that will give you 4 functions which operate in parallel and that gives you a feeling like you have four main functions in your program. If you get to make the 4 LEDs flashing at the same time, you can simply fill in the code and do what you wanted at the same time.
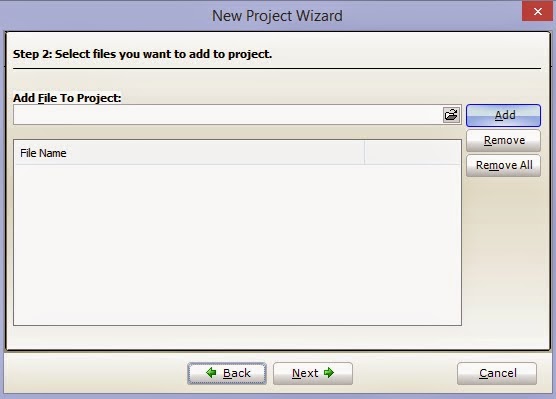
Creating the Project by the MikroC pro software
Create a folder on which you will unzip the file OSA "osa_ficher.zip" and then start MikroC Pro to create our project

Click ADD to add files OSA operating system


Once you have finished creating the project, now we will configure our project so as to use HS oscillator and PLL activate the block

Now open the OSAcfg_Tool.exe application and select the following options. Once you have finished click Save and save the configuration file in the folder of your current project.

The saved file OSAcfg.h requires adding to our project. In MikroC, go to Project menu and add OSAcfg.h file in the project.
Timer configuration
Why RTOS program requires configuring the timer! All RTOS should keep track of time. Because every time the kernel needs to know the time to generate accurate delays and calls scheduler function. In fact, you can not track your dynamic architecture without having any notion of time. You know that there is an internal timer PIC that allows you to count the time. But the clock of our operating system runs much slower than this timer. We would therefore increment the clock of the operating system by one tick each time the timer overflows is done.
I plan to have all tick every 1ms. This means that you will not be able to call for delays less than 1 ms. Now start TimerCalculator and select the following options.

TimerCalculator InitTimer0 generates a function that you call early in the program to configure your timer. Then copy both the functions in your code.
In your main function, call InitTimer0 in the header insert #include <osa.h> at the end of access to system functions to increment the clock each overflow timer, insert a call OS_Timer () in the interrupt function, like this:


Now we will write the code for each thread and create thereafter purpose of performing the scheduler to complete our program like this:


Once you've finished compiling your program and load the executable in the peak.

Downloads:
Timer Calculator for MikroC
File sources OSA
The config file generator
The application with the isis scheme
Note: Credit of this project goes to MR.Motahhir Sa'd
No comments:
Post a Comment